“24 days!!! I knew there had been AMAZING results, but I had no idea they were this good!!! I couldn’t even wait 30 days to compare. No filter! Same lighting, only difference is the hair😆 WOW! Just wow!!! That’s all I can say!! Edited to share products used: The Deep Pore Trio, Dermaplex A, Eye Repair Gel (HUGE improvement), Renew Facial Exfoliator (a fave), and Facial Masque.”
She used:
Deep Pore Trio
Dermaplex A Line Reversal Peptide Serum
Smooth n Firm Eye Repair Gel
Renew Facial Exfoliator
Facial Masque
Before-and-After Photos Are Always Inspiring
Your daily skin care routine becomes even more worthwhile when you can share your progress with others using before-and-after photos. Using L’BRI products consistently over time can lead to Believably REAL Results you can see and feel. Capturing your journey to clearer, firmer, smoother, brighter, healthier-looking skin is simple and fun. Here are a few tips to help you track your progress and capture clear, authentic results. Remember, consistency is key!
Start with a Consistent Routine
First, decide which results you’d like to see. Then, choose the products you need to see those results. We recommend using a Skin Care Trio as the center of your routine and adding other products to target specific concerns. It’s important to be consistent and patient. Be ready to capture any results you see.

“I am absolutely loving this. 5 weeks using L’Bri. I feel kinda young again.”
Before-and-After: Take Consistent Photos
Start by taking a before photo. This benchmark is an exciting way to see just how far you’ve come. The most important rule in taking before-and-after photos is to try to keep them as consistent as possible. You can achieve this by using the same background, lighting, camera angles, and facial expressions for every photo.
Simplify Your Background
Keep the background neutral and uncluttered. A plain wall or simple surface works perfectly.

She used:
Smooth n Firm Eye Repair Gel – AM
Intense Eye Repair Cream – PM
Find the Best Lighting
Natural light is best. Try to take your photos in the same location at the same time of day, preferably in the shade. Bright, direct sun can cause harsh shadows and overexposure. If you’re taking your photos indoors, avoid strong overhead lights. Remember to watch for shadows.
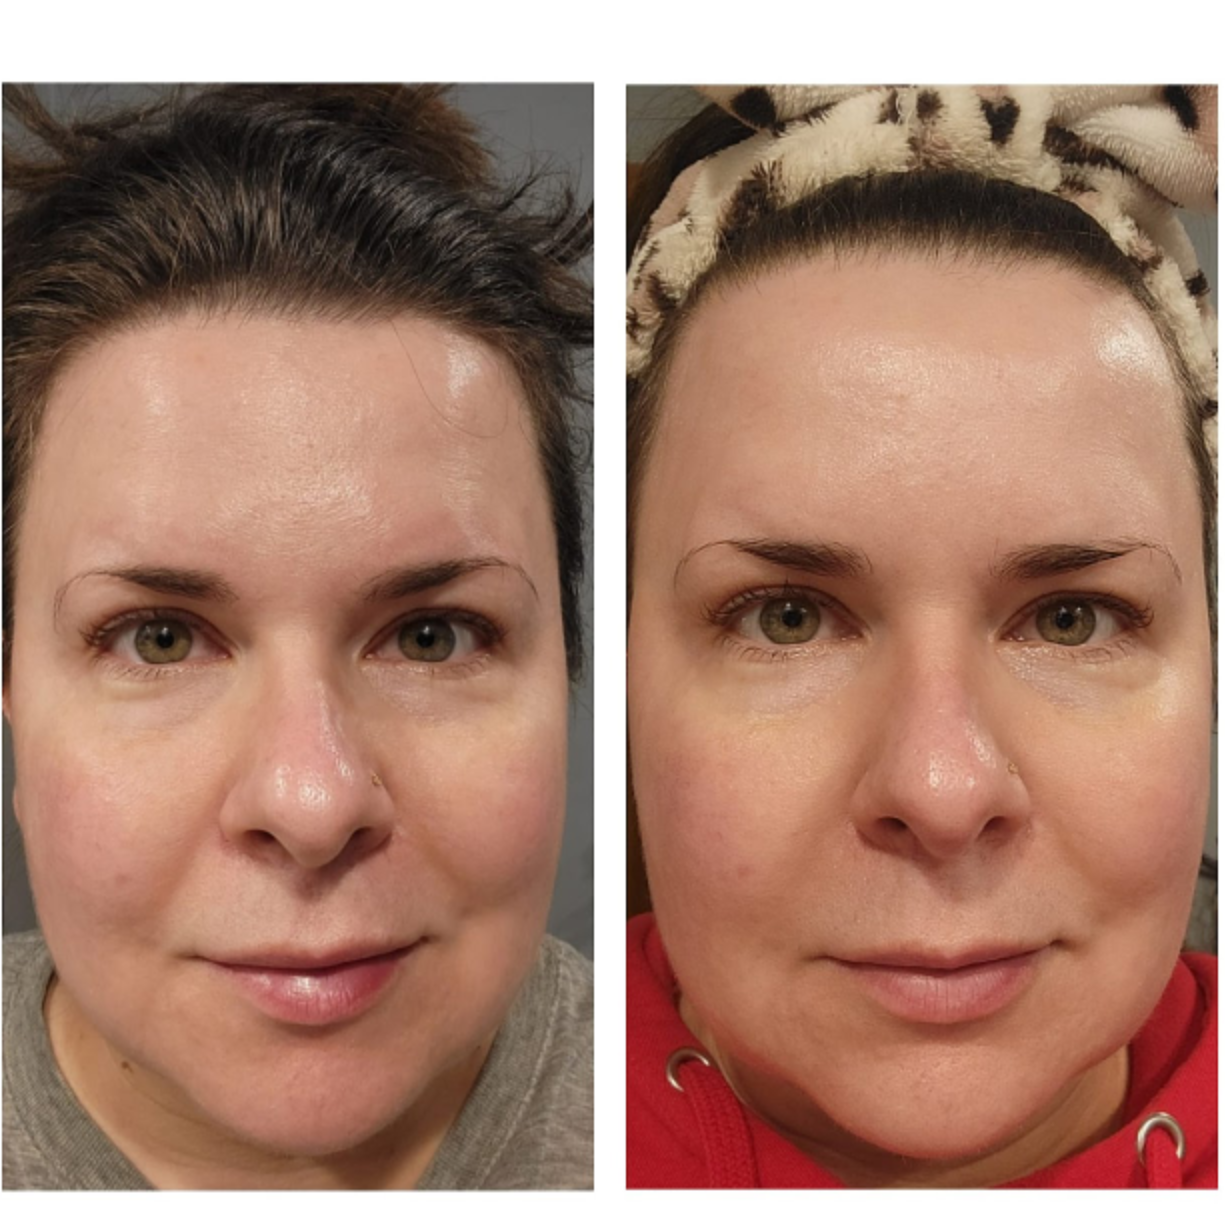
“These are my Vita-C results after about 7 weeks. Do you notice much of a difference?” -Erin J.
She used:
Vita-C Power Set
Use Consistent Camera Angles
Take before-and-after photos from the same angles and distances from your face to maintain consistent proportions for comparison. Shooting from several angles will give you options when capturing the perfect angle for your after-photos. For instance, use a side shot for acne scars and dark spots. Use a straight shot to showcase overall skin tone and brightness. Be sure to capture your entire face. You can always zoom in later if necessary. Make sure your shot is in sharp focus.
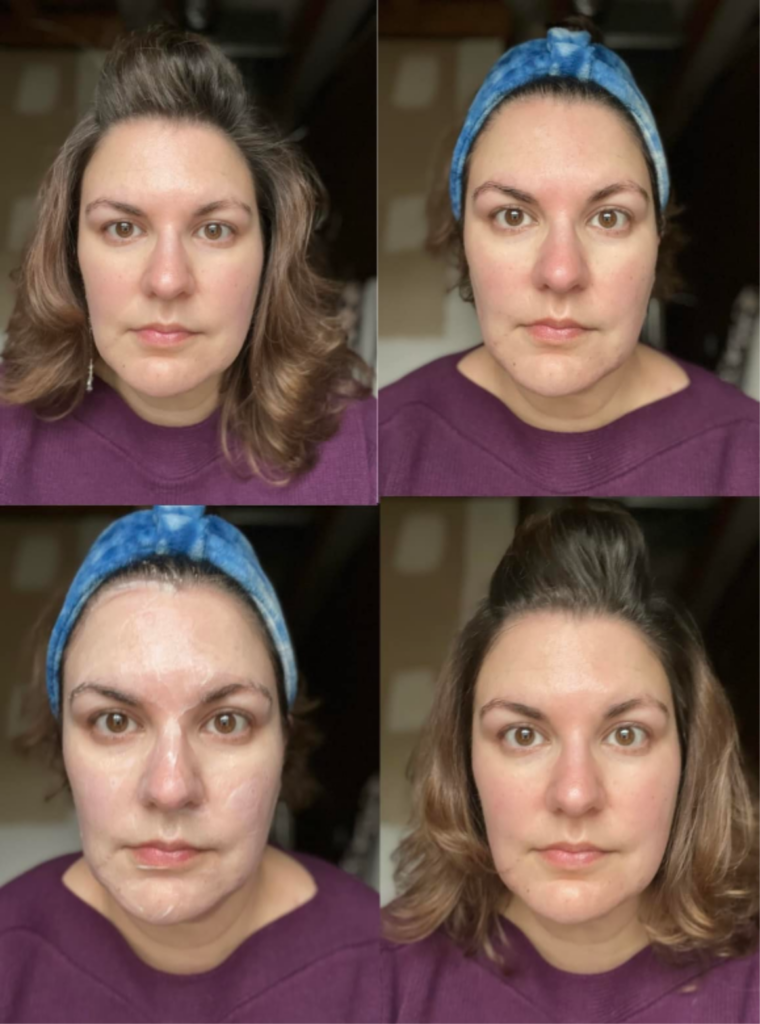
Katrina S. Before-and-After
“So I wanted to do a before, during, and after for the new Vita C Masque 🤗 Top left is before, then to the right is a clean/dry face, then masque, and then after I wiped it off. Glowing skin and hydrated!! I still feel it working into my skin 💗 I’m obsessed!!”
She used:
Vita C Hydrating + Antioxidant Blend Anti-Aging Masque
Use the Same Camera
Use the same camera or smartphone for both before and after photos. Cameras have varying resolutions and settings, which could affect the color and outcome of your photos.
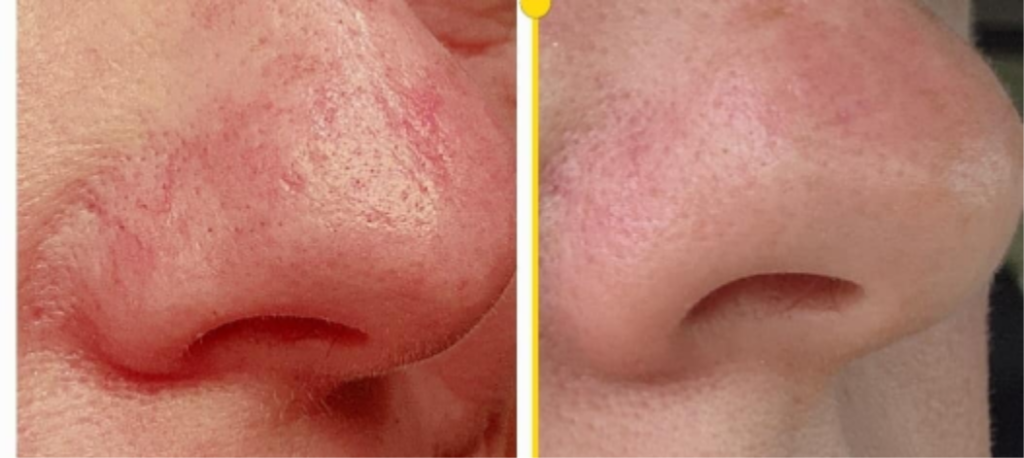
“Just me being vulnerable again! So i have been spot treating the pores on my nose with Time Erase for about 2 weeks in the pics! Look at the difference! No filter! Embarrassing a little but wow!! With 4 autoimmune diseases it is hard to keep redness at bay but L’BRI has def changed that!! My pores on my nose have always been huge. Using my L’BRI has greatly improved everything but using spot treating with Time Erase has dramatically improved. Most people don’t notice how things look until up close or seeing before and after but we notice everything about ourselves! Do your before and after pics and encourage customers too also so they can see their difference! Free to share!”
She used:
Time Erase AHA Slow Release Serum
Use the Same Facial Expressions
This is all about you! So, be yourself. Remember, consistency is key. Be sure to maintain the same facial expression you used in your before photo.

Betty W. Before-and-After
She used:
Neck Firming Cream
Track Your Progress
Before-and-after photos can help you see small, incremental changes over time. They provide a clear visual record of your skin’s progress, making it easier to track improvements. With each photo, you can celebrate the subtle yet impactful transformations that happen when you prioritize skin care.
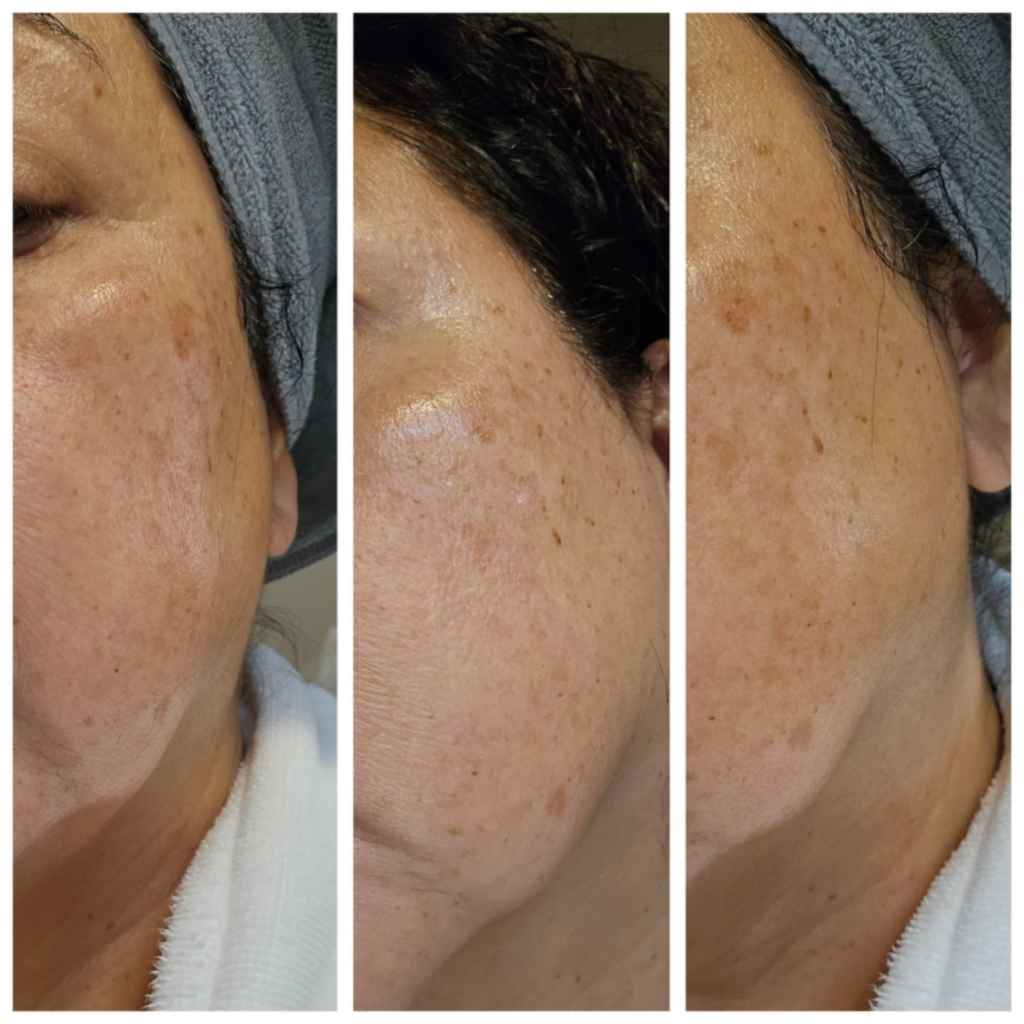
“I’ve been a L’BRI customer for well over a year and recently joined as a consultant because I wanted/needed to start some anti-aging products. I wanted my own testimonial, and here it is! I started Time Erase on Dec 20th for my sun/age spots. (That my dermatologist said, “it’s just a part of aging.”) The side pictures are when I started. The middle picture was taken on Jan. 7th. I can already see the lightening of my “spots”! I love L’BRI even more.”
She used:
Time Erase AHA Slow Release Serum
Document Your Results
Along with your photos, keep a record of your skin care routine, the products you’re using, and any changes you notice. This practice will help you see progress more clearly over time.

She used:
Skin Care Trio
Maxifirm + Peptides Skin Renewal and Lifting Serum
Neck Firming Cream
Facial Masque
Before-and-After: REAL Results Are the Best Results
Adding a filter can change your skin’s true texture and tone. Skip the edits. Unfiltered, Believably REAL Results make the greatest impact of all.
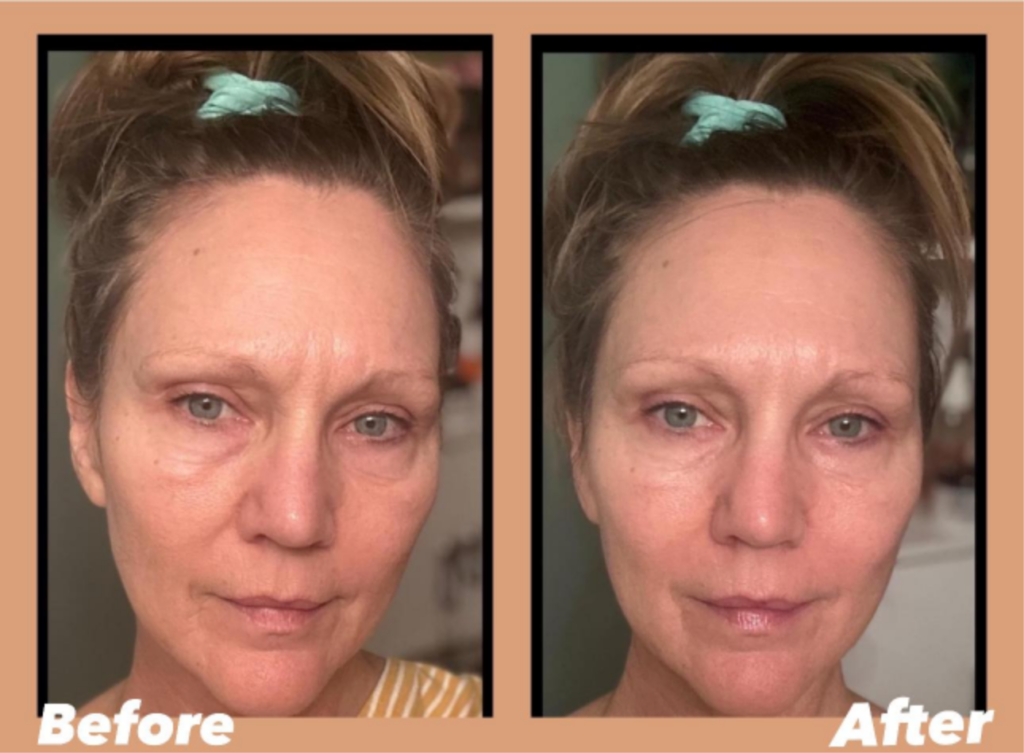
“🍊Before and after my Vita-C Masque. These photos were taken 15 minutes apart. I am obsessed with the new Vita- C products. And they smell amazing, but doesn’t everything L’BRI? 🧡”
She used:
Vita-C Masque
It’s exciting to see Believably REAL Results through the Power or Aloe. Taking before and after photos can be an important step in your skin care journey, even if you keep them all to yourself. They can help you stay inspired and motivated to keep up the good work and celebrate every positive change, no matter how small. Why not start documenting your skin care journey today?
Please share your journey to happier, healthier-looking skin with us! We look forward to hearing from you.

